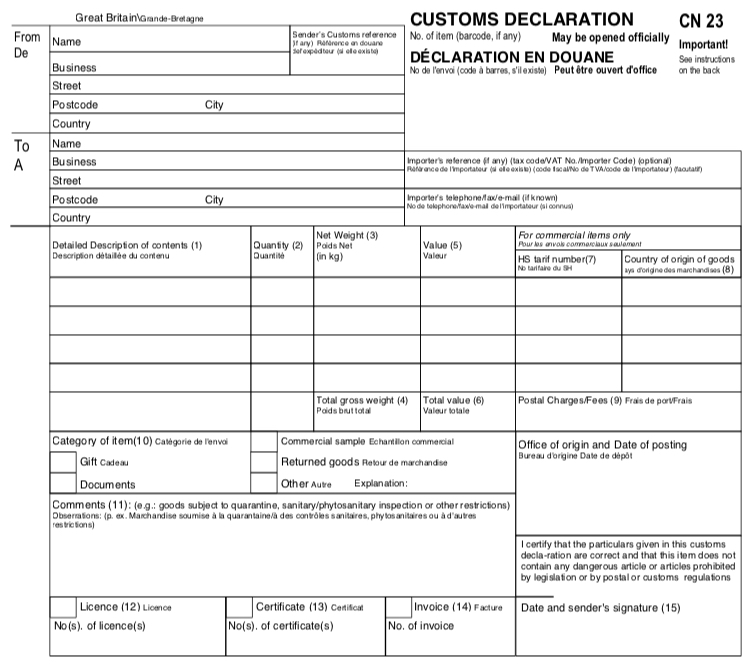
• The nature of the goods (including a detailed description and value)
• The country of origin.
• The customs tariff number (if known)
Do You Need A Certificate of Origin too?
In some cases, because the CN23 Form contains the “country of origin” of the goods you’re sending overseas, you may need to ask your buyer (or the final recipient of your goods) if they need a Certificate of Origin; this is required to identify the country where the goods originated and your buyer may need it to authenticate that the goods originated from the country you’ve stated. To avoid the unnecessary difficulty and expense of getting a Certificate of Origin, ask your buyer first if they need it, as it may not always be required.
When is a Customs Declaration CN23 Form used?
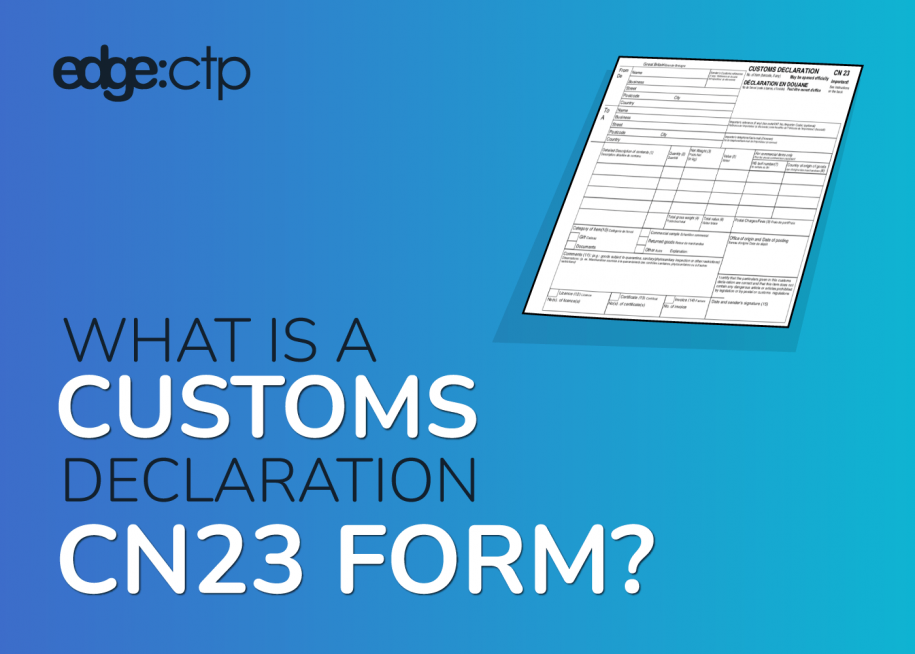
If your goods are being transported outside of the UK and have a value over £270, then you must attach a signed and dated CN23 Form; this informs customs authorities about the contents of your package and prevents the trading of banned or restricted items. A Customs Declaration form will include information regarding the nature, purpose, origin, value, and if known, the customs tariff (HS Code) of your consignment.
Why do I need a CN23 Customs Declaration Form?
You MUST have a Customs Declaration to send goods outside of the UK. If a declaration is not provided or is completed incorrectly it can lead to delays or even seizure of the goods.
Where can I get a CN23 Form?
You can get a CN23 template from:
- Any UK Royal Mail Post Office branch: you will be provided with a physical document which you complete by hand, securely attach to the front of your package, and arrange postage.
- Alternatively, download a free CN23 template Form here; fill it in; print it; securely attach it to the front of your package, and arrange postage.
- If you have a regular need for CN23 forms because you’re sending numerous packages internationally, then use an online solution such as EdgeCTP to help you generate both paper and electronic versions of a Customs Declaration (CN22 Form and CN23 Form). As well as generating your legal documents, Edge also stores your product(s) and client contact details for a simpler process next time. So, if you are sending repeat package requests, it’s super easy and efficient – saving you time and money. And if you sign up today, you get your first 14 days FREE. It’s a win-win!.
How do I complete a CN23 Form?
Simple! Here’s a field-by-field guide to completing a CN23 Form. There are instructions on the back of the CN23, which you can follow to complete it. However, in this example, we’re using the 14-day-FREE trial version of the Edge platform to help you complete your CN23.
a) Create a New CN23 Document
Once you’ve signed up and signed in to Edge:
- Choose Customs Documents > Customs Declarations to bring up the Customs Declarations dashboard.
- Choose New Customs Declaration > Custom Declaration CN23 to bring up a new CN23 data entry form.
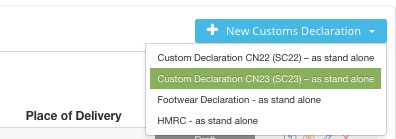 Creating a CN23 Form within Edge
b) How to fill in a CN23 Form
When the CN23 data entry form opens, you will see the ‘Help Text (On/Off)’ which can guide you through each field, you can also access a complete instruction guide which you can ‘show/hide’. Or simply follow this example:
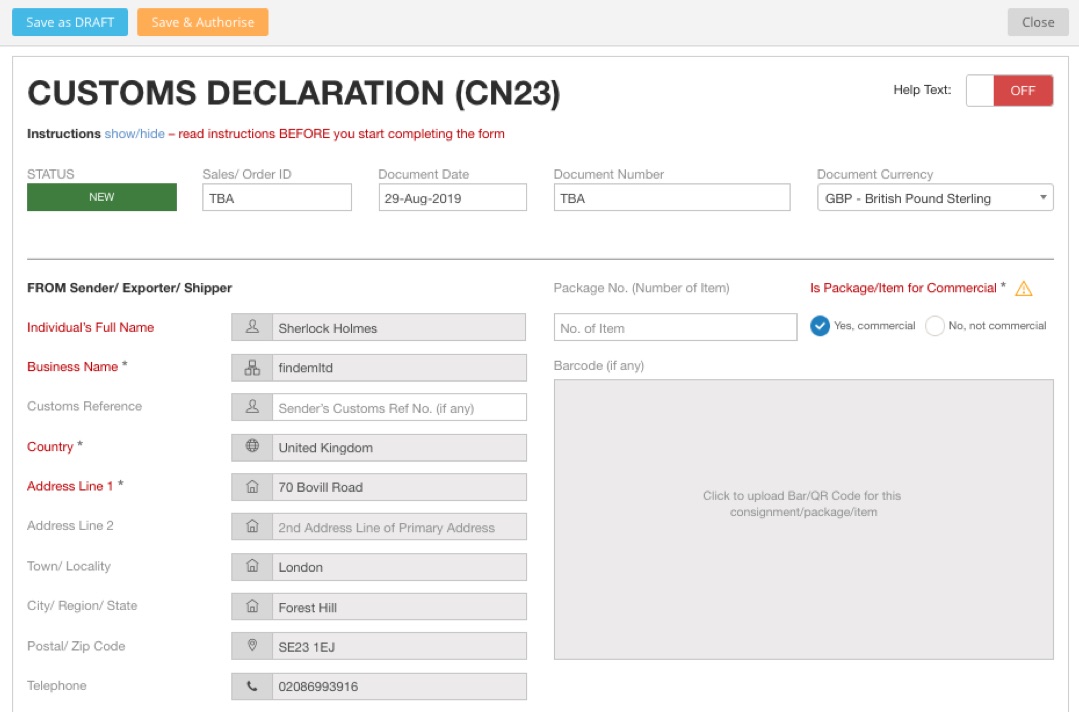
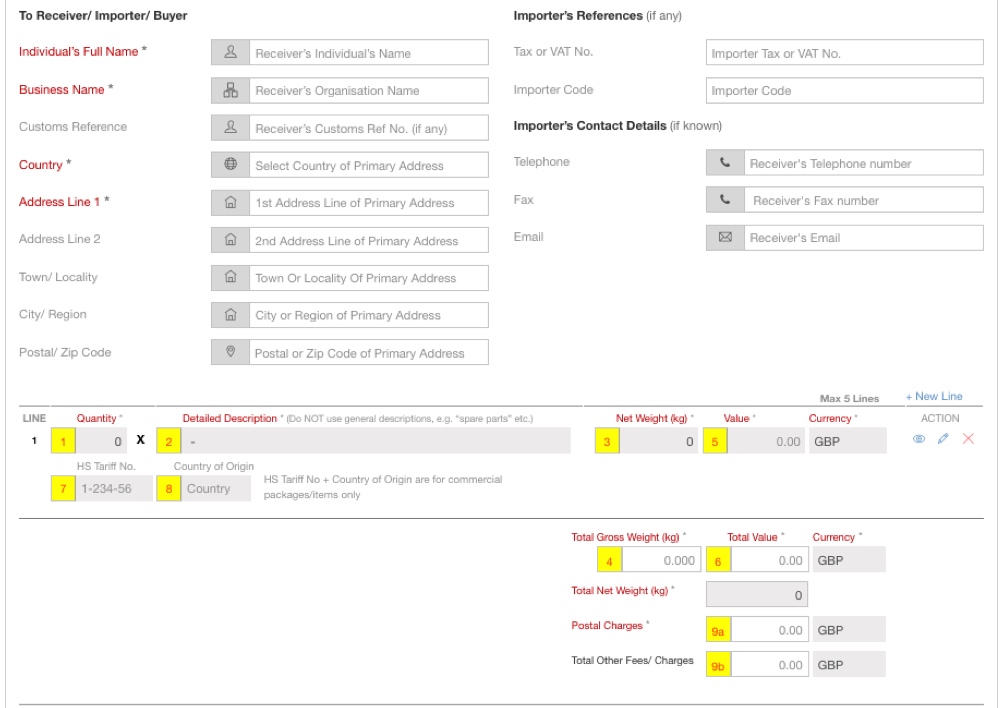
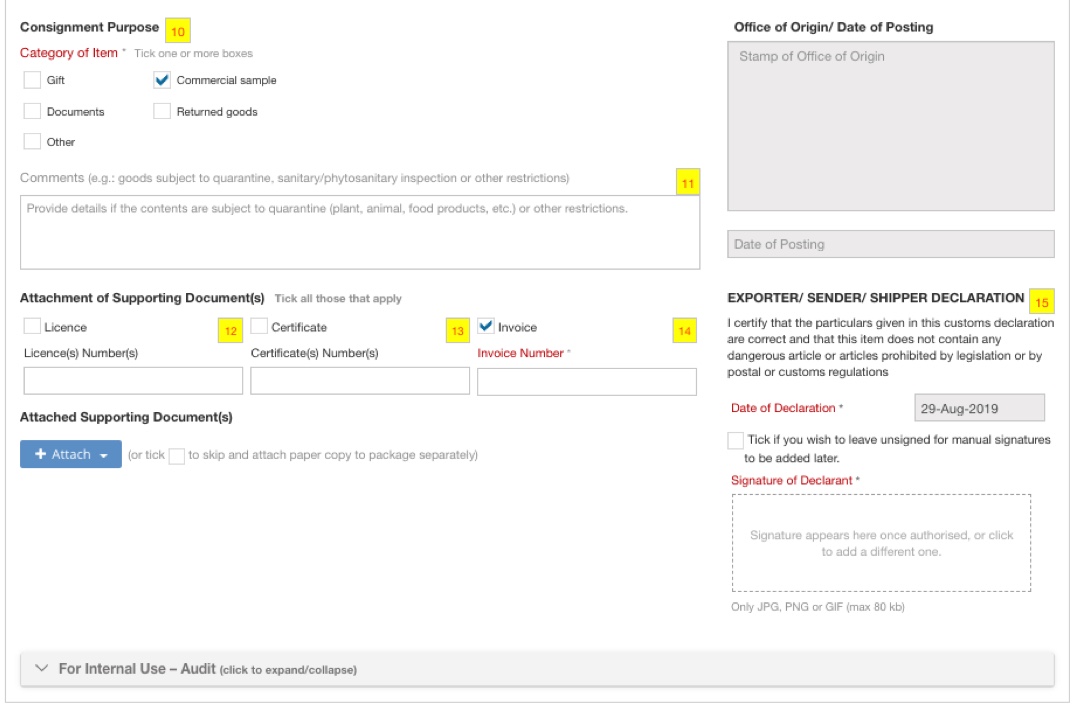
CN23 Field-by-Field Entry Guide
- Sales/ Order ID = Automatically set, if you’re doing this as part of a specific sales order (within Edge). You can alternatively enter one of your own or leave it blank.
- Document Date = Automatically set to the current date, which should be the date you are filling out the form.
- Document Number = Optional, add a number to uniquely identify the package to this CN23 form.
- Document Currency = Automatically set to GBP – British Pounds Sterling, adjust accordingly.
- FROM Sender Details = Mandatory, so if you’re the sender of the goods, then add your details: name, business name, country, and address.
- Package No. (i.e. the number of packages) = Optional, add how many packages you are transporting. This is NOT the number of items in a package, it’s the number of packages being sent.
- Is Package/Item for Commercial = Mandatory, indicate the purpose of the goods being sent, either for commercial or non-commercial usage/resell. If it is for commercial use, then you’ll need to also supply a Commercial (Export/Customs) Invoice with this CN23 Declaration. Learn how to create a commercial invoice if you don’t already have one.
- Barcode = Optional, add any barcodes that relate to the package that you are sending; this will help with tracking purposes.
- TO Receiver Details = Mandatory, add details of the person/organisation who will receive your goods. At the very least, add their name, business name, country, and address.
- Importer’s Reference and Contact Details = Optional, provide these details to assist with ‘faster’ customs clearance.
- Product Details = For each product in the package (maximum of 5), provide the details (numbered 1 to 8 in the example) by clicking the Action Edit icon (pencil) on the right of the detail line, these include:
- Product ID = Optional, add the stock item number (if previously used, the details will automatically populate; if not, then this entry will be saved for next time).
- Product Name = Mandatory, add the name of the stock item
- Quantity [1] = Mandatory, add the quantity of the stock item within the package.
- Product Description [2] = Mandatory, add the description of the stock item.
- Net Weight (kg) [3] = Mandatory, enter the net weight of the stock item in kilograms. If less than a kilogram then state in fractions of a kilogram, e.g. 0.25 kg for 250 grams. Note this is the ‘net’ weight of the product, which will be summed with any other product(s) to create the Total Gross Weight (kg).
- Value [5] = Mandatory, enter the agreed price a single stock item will be sold for in the specified currency e.g. 650.00 GBP (if necessary, set the FX Rate). This must match with the product on the Commercial/Export Invoice, if attached for any commercial purpose goods.
- HS/Customs Tariff Number or Commodity Code [7] = Optional, if known set the custom tariff for the stock item; you can find this through the ‘help me find it’ link or get in touch with support@edgectp.com for assistance.
- Country of Origin [8] = Optional, if known set the Country of Origin of the stock item (i.e. where the product was made and where its components originate from); as you begin typing, a selection of countries will appear, select the correct one and the two-character shortcode for that country will automatically be displayed.
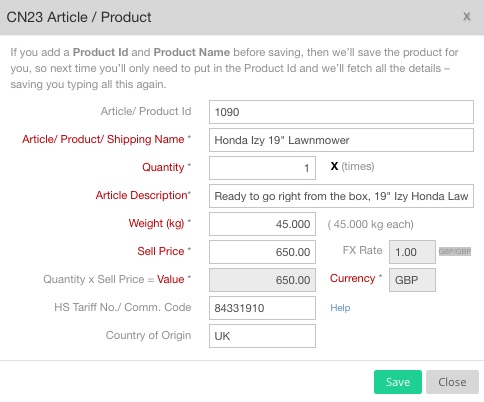
Adding product details
- Total Gross Weight (kg) [4] = Mandatory, check/add/adjust the total gross weight of the package (INCLUDING all the wrapping and packaging weight).
- Total Value [6] = Mandatory, check/add/adjust the total value of the package (in the chosen currency) and this MUST match with any supporting Commercial Invoice.
- Total Net Weight (kg) = Mandatory, check/add/adjust the total net weight of the package (EXCLUDING all the wrapping + packaging weight).
- Postal Charges [9a] = Mandatory, check/add/adjust the postal charges for sending the package to your destination; this is in addition to the Total Value of the goods.
- Total Other Fees/Changes [9b] = Optional, add other charges paid for the package e.g. insurance or brokerage fees etc.; this is in addition to the Total Value of the goods.
- Consignment Purpose/ Category of Item = Mandatory, tick one that applies
- Comments = Optional, add any comments to assist with the customs clearance of the goods.
- Attachment of Supporting Documents (i.e. Invoice) = Optional (Mandatory if goods are of a commercial nature, in which case you need to add a Commercial (Export/Customs) Invoice to clear customs controls efficiently). There is an option to electronically create a Commercial Invoice within Edge and attach it to the CN23, or simply add your own. In either case, obtaining a physical copy and attaching it to one side of the package is advisable.
- Attachment of Supporting Documents (i.e. Certificate) = Optional, and only if your buyer wants a Certificate of Origin or Movement Certificate for the goods you are sending, only then should you acquire a certificate; otherwise, proceed WITHOUT one. If you do get a certificate, then print and attach a copy to the package.
- Attachment of Supporting Documents (i.e. Licence) = Optional, and only if your buyer or destination country requires you to provide a licence for the product(s) you are sending. If you do get a licence, then print and attach a copy to the package.
- Declaration = Mandatory, read the declaration and make sure you agree with it, then check that the Date of Declaration is correct, otherwise rectify; click the Signature of Declarant box and your preloaded digital version of your hand-signature will appear. If you’ve yet to do so, you can select and upload a new one.
- Click the [Save & Authorise] button, on the top left, once you’re satisfied that the CN23 completed; if confirmation is requested, click [Save]
c) Printing a CN23 Form
Having created a CN23 (in EdgeCTP), saved and authorised it, printing the CN23 Form is just a matter of following these steps:
- Find and open a previously saved CN23 Form or create a new one (as above).
- From the top of the CN23 form click the [Generate PDF] button and choose:
- CN23 A4 plain paper = this will generate a PDF version of the CN23 form for printing on an A4 piece of paper, positioning the print-out in an A4 landscape, with the form in the centre.
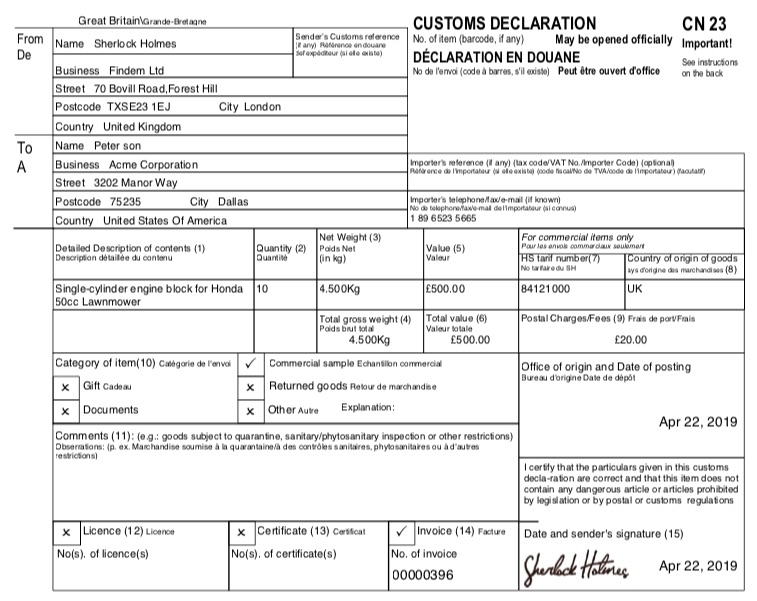
Related Topics
- What is a Commercial (Export/Customs) Invoice?
- What is a Certificate of Origin?
- What is a CN22 Form?
[/fusion_text][/fusion_builder_column][/fusion_builder_row][/fusion_builder_container]
